
Every time I read ‘free from’ gluten, egg, nut or dairy I feel lucky not to be allergic to any of those delicious ingredients.
When my baby was just one month old, she started crying in pain after every feed. The kind advice I received on how to soothe her didn’t work so in the end I decided to change my diet, quitting dairy, nuts and gluten. And it worked!
To my surprise, I discovered new products that stopped me from craving dairy or wheat flour. In London the variety of products ‘free from’ you can buy is huge. Even at your local cafe it’s easy to get an oat milk latte and a poached egg over gluten free bread…what a feast!
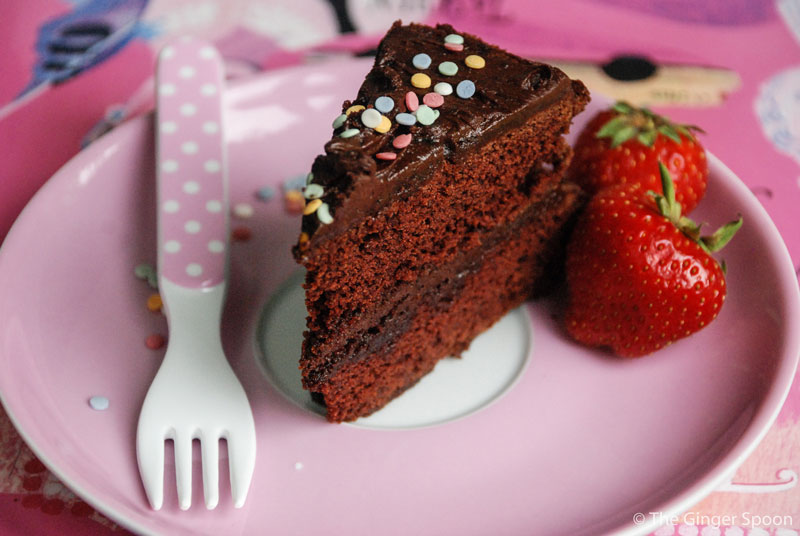
On my birthday my two older daughters were in charge of making my birthday cake ‘free from’. I read many recipes to avoid disappointing my little chefs until I found this one. It’s perfect in every way…very easy to make and yummy.
The recipe was tested three times in my kitchen (I never share recipes that I haven’t tested at least three times). If you follow the instructions accurately I promise you’ll get a very moist and dense chocolate cake.
My only problem was the filling. As a Chilean I grew up eating cakes filled with ‘manjar’ (caramel) or chocolate ganache, both of which contain dairy. So I tried two different ‘free from’ icings (see photos): a chocolate icing and a coconut-vanilla bean icing (pink colour). I’m still testing them so as soon as I get a winner I’ll share that recipe too.
For now please try this cake and let me know if you like it.
Enjoy!
Portions: 12 Prep Time: 15 minutes (plus 25 minutes in the oven)
Ingredients
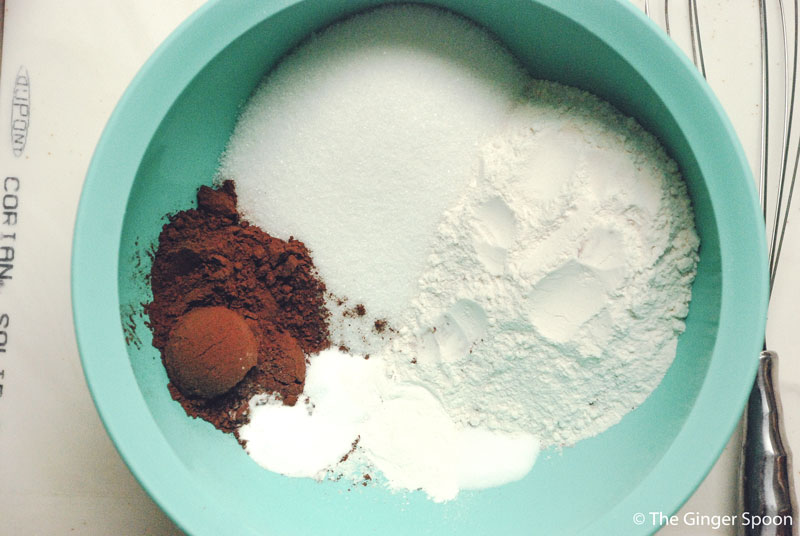
3 cups of rice flour**
1 3/4 cups of granulated sugar
6 tablespoons of unsweetened cocoa powder
2 teaspoons of bicarbonate of soda (or baking soda)
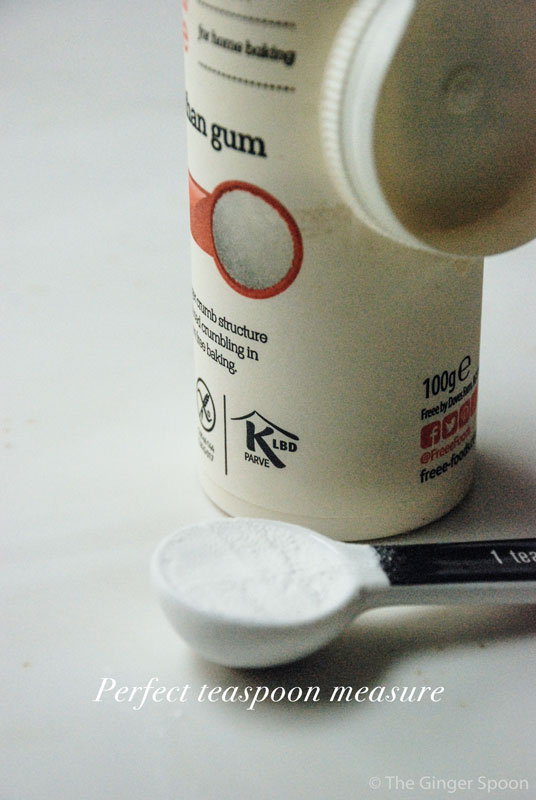
2 teaspoons of xanthan gum**
1 teaspoon of salt
2 cups of chocolate nondairy milk (I used chocolate oat milk)
1/2 cup of vegetable oil
2 tablespoons of apple vinegar
1 teaspoon of vanilla extract
**It sounds hard to get but I found it on my regular online supermarket
Equipment
2 20cm or 8’’ cake pans
Measuring cups
Measuring spoons
Scissors
Baking/Parchment paper
Spray oil
1 big bowl (dry ingredients)
1 medium bowl (wet ingredients)
1 Spatula
1 Whisk
Just a little reminder before you start. In baking when we talk about cups or spoons we are not talking about your china or cutlery. Please buy measuring cups and measuring spoons, they are inexpensive and last forever.

Instruction
- Preheat the Oven to 180C/ 350F/ UK Gas 4
- Coat two 20cm pans with cooking spray and cut two circles of parchment paper. Put them in the bottom of each pan
3. In a big bowl put the dry ingredients; flour, sugar, cocoa powder, baking soda, xanthan gum, and salt. Whisk and blend them together
 4. In a medium bowl put the wet ingredients; milk, oil, vinegar and vanilla. Blend them with a wisk.
 5. Pour the wet ingredients into the dry ingredients. Stir well until the mix looks smooth. The consistency should be sticky, not runny
 6. Divide the mix equally into the two pans. With a spatula smooth the surface of the mixture and give it a little shake to help put everything in place
 7. Place the pans in the middle rack of the oven for around 25 minutes (remember! each oven is different) or until a wooden stick (or sushi stick) comes out clean if you insert it in the middle of the cake

 8. Remove from the oven and let them cool for 15 minutes. Then remove from the pans and let them cool completely
9. Time to fill the cake!
Tip1: It is very important to follow the quantities given in the recipe. Baking is chemistry.
Tip2: You can fill the cake straight away once is cool but I recommend filling it the next day.
Tip3. To save the cake for another day, wrap the cake layers individually with cling film. You can also re-place them in the pans to give them extra protection.

Gluten Free Dairy Free Vanilla Coconut Icing

Gluten Free Dairy Free Chocolate Icing
Very Moist Chocolate Cake (Dairy-Egg-Nut and Gluten Free)

Ingredients
3 cups of rice flour**
1 3/4 cups of granulated sugar
6 tablespoons of unsweetened cocoa powder
2 teaspoons of bicarbonate of soda (or baking soda)
2 teaspoons of xanthan gum**
1 teaspoon of salt
2 cups of chocolate nondairy milk (I used chocolate oat milk)
1/2 cup of vegetable oil
2 tablespoons of apple vinegar
1 teaspoon of vanilla extract
**It sounds hard to get but I found it on my regular online supermarket
Equipment
2 20cm or 8’’ cake pans
Measuring cups
Measuring spoons
Scissors
Baking/Parchment paper
Spray oil
1 big bowl (dry ingredients)
1 medium bowl (wet ingredients)
1 Spatula
1 Whisk
Just a little reminder before you start. In baking when we talk about cups or spoons we are not talking about your china or cutlery. Please buy measuring cups and measuring spoons, they are inexpensive and last forever.
Instruction
- Preheat the Oven to 180C/ 350F/ UK Gas 4
- Coat two 20cm pans with cooking spray and cut two circles of parchment paper. Put them in the bottom of each pan
- In a big bowl put the dry ingredients; flour, sugar, cocoa powder, baking soda, xanthan gum, and salt. Whisk and blend them together
- In a medium bowl put the wet ingredients; milk, oil, vinegar and vanilla. Blend them with a wisk.
- Pour the wet ingredients into the dry ingredients. Stir well until the mix looks smooth. The consistency should be sticky, not runny
- Divide the mix equally into the two pans. With a spatula smooth the surface of the mixture and give it a little shake to help put everything in place
- Place the pans in the middle rack of the oven for around 25 minutes (remember! each oven is different) or until a wooden stick (or sushi stick) comes out clean if you insert it in the middle of the cake
- Remove from the oven and let them cool for 15 minutes. Then remove from the pans and let them cool completely
- Time to fill the cake!
Tip1: It is very important to follow the quantities given in the recipe. Baking is chemistry.
Tip2: You can fill the cake straight away once is cool but I recommend filling it the next day.
Tip3. To save the cake for another day, wrap the cake layers individually with cling film. You can also re-place them in the pans to give them extra protection.

This cake looks incredible, thanks for the recipe!
LikeLike
Thank you so much! I just visited your blog and now you have a new follower. Nice work!
LikeLiked by 1 person
Thank you Maria, happy that you followed my blog, hope you’ll check out my future recipes! 🙂
LikeLike
Pingback: Delicious Frosting! (Dairy-Egg-Nut and Gluten Free) | The Ginger Spoon